 XML Software | edit-xml.com
Edit XML With More Comfort
XML Software | edit-xml.com
Edit XML With More Comfort


User Manual For Easy XML Editor v1.7.8
Content:1.
Open Files
1.1 Using the Open Dialog
1.2 Via Drag-and-Drop
1.3 Using 'Opened Recently'
2. Editing the XML Tree
2.1 Edit Node Name and Node Text
2.2 Selection Lists for Element Names/Attribute Names
2.3 Change Node Type
2.4 Edit Text Content Multi Lined
2.5 Edit Attributes
2.6 Add Nodes
2.7 Add Nodes/Attributes Using Dialogs
2.8 Copy Node to Clipboard
2.9 Paste Nodes and Attributes From the Clipboard
2.10 Delete Nodes
2.11 Move Nodes
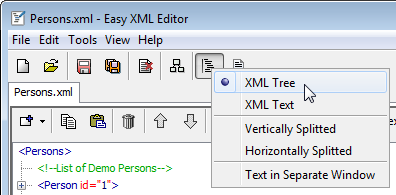
2.12 Sub Views
2.13 "Modificator"
3. Quickly Add Similar Elements/Attributes
4. Edit the XML Code
4.1 Synchronize Changes
4.2 Select Nodes of XML Tree in XML Code
4.3 Use Line Wrapping and Syntax Highlighting
4.4 Customize Font Face and Font Size
4.5 Customize Tabulators and Line Breaks
5. Full Text Search/Replace
6. Undo/History
6.1 Activate Tracking Changes
6.2 Ways of Modification Indication
6.3 Listing of Modifications
7. Edit XML Data Using the Table Edit Feature
7.1 Step 1: Selecting the Table Root Node
7.2 Step 2: Open the Editor to Create the Table Definition
7.3 Step 3: Choosing the Reference Node and Saving the Table Definition
7.4 Step 4: Apply Changes to XML Data
7.5 Options of the Table Edit
7.6 Exporting the Data of Table Edit
8. Encoding
8.1 Save
8.2 Supported Encodings
8.3 Preselection for New Files
9. Edit XML as Graph
9.1 Open Graph View
9.2 Show/Hide Sub Elements
9.3 Select Boxes
9.4 Edit Elements
9.5 Align and Distribute
9.6 Adjusting Connection Lines
9.7 Save/Load Layouts
9.8 Print View
9.9 Choose Design
10. Customizing the User Interface
10.1 Rearrange Tabs
10.2 Hide the Panels on the Right and the Bottom Temporally
10.3 Configure the Font Sizes and Font Appearance of The XML Tree and the Table Edit
10.4 Configure the Basic Appearance of The XML Tree
10.5 Changing the Icons of the Tree
10.6 Configure Colors
11. Save/Print/Export
11.1 Save: Customize XML Output
11.2 Printing
11.3 Export to HTML
12. Short Tips Show in Application
13. The Most Important Hints Described Quickly
1.1 Using the Open Dialog
1.2 Via Drag-and-Drop
1.3 Using 'Opened Recently'
2. Editing the XML Tree
2.1 Edit Node Name and Node Text
2.2 Selection Lists for Element Names/Attribute Names
2.3 Change Node Type
2.4 Edit Text Content Multi Lined
2.5 Edit Attributes
2.6 Add Nodes
2.7 Add Nodes/Attributes Using Dialogs
2.8 Copy Node to Clipboard
2.9 Paste Nodes and Attributes From the Clipboard
2.10 Delete Nodes
2.11 Move Nodes
2.12 Sub Views
2.13 "Modificator"
3. Quickly Add Similar Elements/Attributes
4. Edit the XML Code
4.1 Synchronize Changes
4.2 Select Nodes of XML Tree in XML Code
4.3 Use Line Wrapping and Syntax Highlighting
4.4 Customize Font Face and Font Size
4.5 Customize Tabulators and Line Breaks
5. Full Text Search/Replace
6. Undo/History
6.1 Activate Tracking Changes
6.2 Ways of Modification Indication
6.3 Listing of Modifications
7. Edit XML Data Using the Table Edit Feature
7.1 Step 1: Selecting the Table Root Node
7.2 Step 2: Open the Editor to Create the Table Definition
7.3 Step 3: Choosing the Reference Node and Saving the Table Definition
7.4 Step 4: Apply Changes to XML Data
7.5 Options of the Table Edit
7.6 Exporting the Data of Table Edit
8. Encoding
8.1 Save
8.2 Supported Encodings
8.3 Preselection for New Files
9. Edit XML as Graph
9.1 Open Graph View
9.2 Show/Hide Sub Elements
9.3 Select Boxes
9.4 Edit Elements
9.5 Align and Distribute
9.6 Adjusting Connection Lines
9.7 Save/Load Layouts
9.8 Print View
9.9 Choose Design
10. Customizing the User Interface
10.1 Rearrange Tabs
10.2 Hide the Panels on the Right and the Bottom Temporally
10.3 Configure the Font Sizes and Font Appearance of The XML Tree and the Table Edit
10.4 Configure the Basic Appearance of The XML Tree
10.5 Changing the Icons of the Tree
10.6 Configure Colors
11. Save/Print/Export
11.1 Save: Customize XML Output
11.2 Printing
11.3 Export to HTML
12. Short Tips Show in Application
13. The Most Important Hints Described Quickly
1. Open Files
The dialog for opening files can be accessed using File->Open in the menu or with the icon in the tool bar:


The open dialog is shown.
Select the file to open and choose 'Open'. This will show the selected file as a new tab in the main window:

As an alternative to the open dialog, you can also open files using drag-and-drop from the Windows Explorer©. For dropping, use the area outside the tree view.
To do this, click a file in the Windows Explorer, hold the mouse button and drag it into the Easy XML Editor window. When dropped there, the file/files is/are opened.

The menu item File->Opened recently provides access to the files recently opened in the application.
Selecting an item in the list will re-open this file.

2. Editing the XML Tree
2.1 Edit Node Name and Node Text
There are several ways to change name and text content of elements. You can use the text fields above the tree, the tab 'Edit' (right) or edit directly in the tree. Modifications are shown immediately.
Direct editing is done by:
- Double click on an element name/text or attribute name/text
- Click on an already selected node or
- The keys F2, F3 or F4 (details on this later in this chapter)
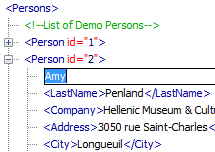
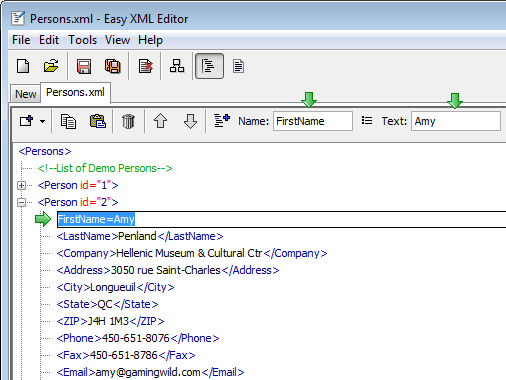
By clicking on an selected node, it is edited as configured in the edit mode of the tree. As default the mode is 'Text'. That means the text content is changed.
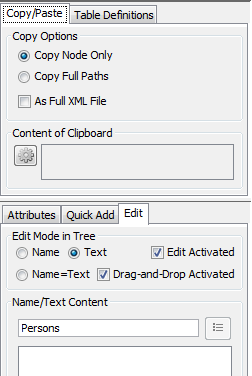
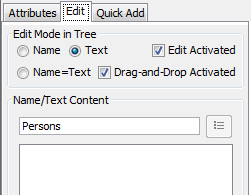
In tab 'Edit' you specify the way of editing, available are:
- Name - Edit the node name
- Text - Edit the text content
- Name=Text - Edit name and text content, type [Name]=[Text], e.g. sex=female

Alternatively you can use these keys to directly enter the way of editing:
- F2: Edit node name
- F3: Edit text content
- F4: Edit name name and text content (Format: [name]=[text])
Here you can also specify whether editing is allowed in general and whether drag-and-drop is activated.
If the node has a long text as content, it can be helpful to wrap the text in the field. Do do so, right click on the field and choose 'Wrap lines'. An example follows.

These changes are marked in the tree, for more information see
Chapter:
6. Undo/History
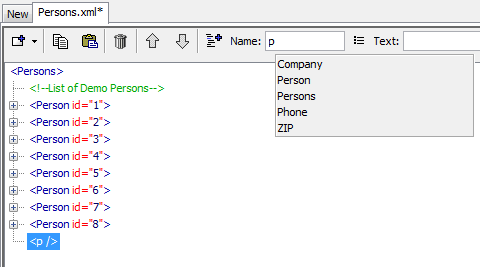
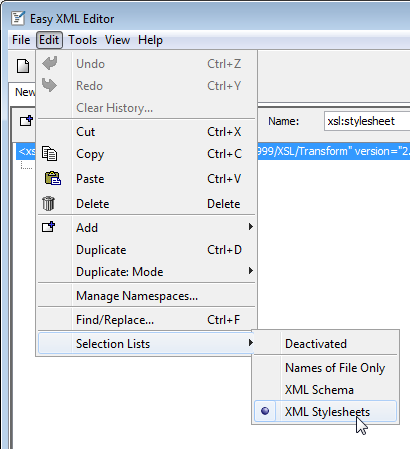
2.2 Selection Lists for Element Names/Attribute Names
When entering a name for an element/attribute, a list of already known names is shown, for example:
This list is composed using the existing node/attribute names and the names of the XML Schema or XML Stylesheet specification (if activated). For an empty stylesheet these names may be selected:

The list entry does not have to start with the text entered.
Which mode is used for the selection lists, is configured in the menu item Edit->Selection lists:
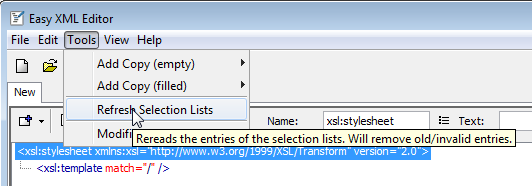
Refresh selection lists: Sometimes it may be necessary to regenerate the list entries. For this the menu item Tools->Refresh selection lists may be used. Selecting this will regenerate the lists of names for all files opened:
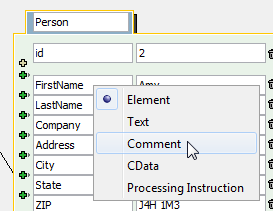
You can change the type of nodes. The Easy XML Editor supports these node types:
- Element
- Text
- Comment
- CData
- Processing instruction
To change the type of a node, select it in the tree and click on the icon 'Change node type':

The list of node types is shown:

As an example we choose 'Comment' and enter a valid comment. The node will be shown as a comment node in the tree:

This example will generate the following XML code:

2.4 Edit Text Content Multi Lined
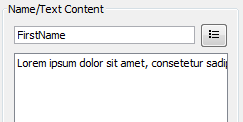
If you want to set longer or multiline texts for a node, you can use the function "Edit multi lined". To do so select the node in the tree and click the icon:

The window "Edit Multi Lined" is opened. Here you can easier edit longer text.
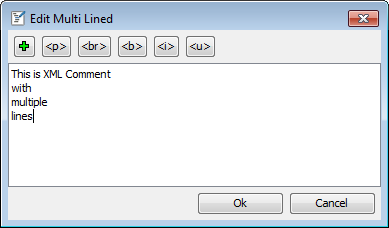
With confirmation of the dialog ("Ok" or CTRL+ENTER) the new text is shown in the tree. Line breaks are shown with the symbol ¶:

If a node text content has a line break, it can only be edited using this feature.
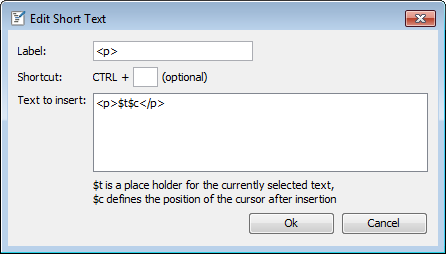
The dialog window offers the usage of text templates. By clicking on one of the buttons or by pressing the key shortcut, the text defined is inserted.
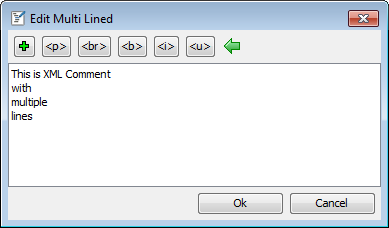
When click with the left mouse button, the text is inserted. On click with the right mouse button you access the options to arrange, delete or edit the text templates:

The following screenshot shows the window to edit a text template. Here you can change label, key shortcut and the text. For the text these special placeholders are available:
- $t: the placeholder $t represents the text that is selected when executing the template
- $c: the placeholder $c defines the position the cursor will be set to after execution of the template
For editing attributes please select the corresponding node. In the tab "Attributes" you can add, delete and edit attributes.

Changes are shown directly in the tree. Helpful key shortcuts for the fields shown are:
- INS, CTRL+DOWN: Add attribute beneath
- CTRL+DEL: Delete attribute
- DOWN, UP, LEFT, RIGHT: with these keys you can jump between the fields
The layout of the edit fields is variable. By dragging with the mouse you can modify the field widths (click and hold left mouse button)

These changes are marked in the tree, for more information see
Chapter:
6. Undo/History
To add a node, select one or more (parent) nodes and choose "Add Node" from the context menu (right click into tree) or use the "Add Node" icon.

This will add a child node to every node selected. Another way to add nodes is described in the next section.
These changes are marked in the tree, for more information see
Chapter:
6. Undo/History
2.7 Add Nodes/Attributes Using Dialogs
If you want to add nodes/attributes, please select the (parent) node(s) in the tree and type one of the keys:
- e add element(s)
- a add attribute(s)
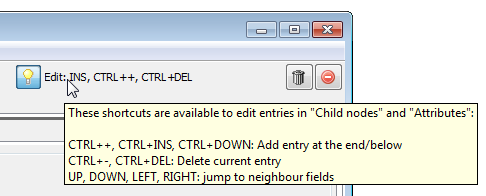
An input window is shown. The shortcuts of the tabs "Attributes" and "Child Nodes" will also work here:
- INS, CTRL+DOWN: Insert entry beneath
- CTRL+DEL: Delete entry
- DOWN, UP, LEFT, RIGHT: with these keys you can jump between the fields
In the window please enter the names and text contents of the new nodes/attributes. With "OK" the new items are added to the selected nodes.

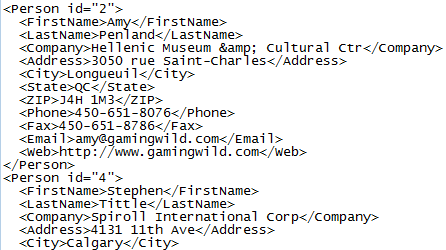
You can copy a selection of nodes to the clipboard.
For this, select the corresponding nodes (hold CTRL or SHIFT key) and choose the copy function from the context menu or using the icon:
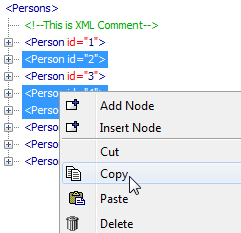

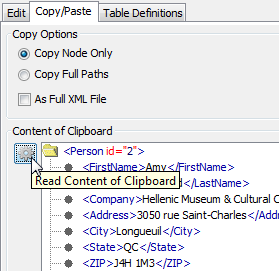
This will copy the selected nodes to the clipboard. The result may look like this<.
Options for copy/paste can be set in the tab "Copy/Paste":
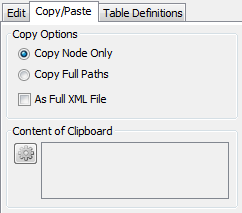
a) With the option 'Copy nodes only' the path of the selected nodes will be ignored. (see example above)
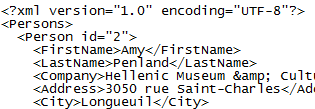
b) With the option 'Copy full paths' the full path to the root will be added to the nodes if copied. The result of the copy operation with 'Copy full paths':
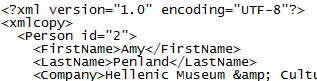
c) With the option 'As full XML file' it will be assured that the result is a valid XML file. The XML tag will be added to the front

and, if necessary, a root element is added that encloses the nodes selected.
2.9 Paste Nodes and Attributes From the Clipboard
For this, select one or multiple nodes the content of the clipboard should be added to. Using the context menu or the icon you access the paste function:
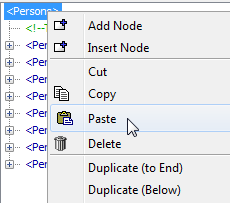

The content of the clipboard has been added to the nodes:
You can paste attributes, too. For this, the clipboard must contain text in the format [name]="[text]", multiple lines are possible. An example follows. Using this text you will add the attribute "id" und "type" with the contents "007" and "archived".

In the tab 'Copy/Paste' a preview of the clipboard XML data is available.
An example:
By clicking on the refresh button, the content of the clipboard is re-read.
These changes are marked in the tree, for more information see
Chapter:
6. Undo/History
You can delete one or multiple nodes with one operation. To do this, select the node(s) and select the delete function from the context menu or using the icon.


These changes are marked in the tree, for more information see
Chapter:
6. Undo/History
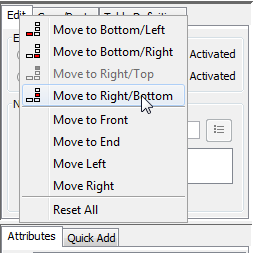
With the move function you change the order of child nodes of a (parent) node. Do do this, select the node and click the appropriate icon.


After moving the node the XML file from above may look like this:
For easier handling move operations can also be executed using the mouse wheel. Select the node and hold down the ALT key. Moving the mouse wheel will move the node up/down.
These changes are marked in the tree, for more information see
Chapter:
6. Undo/History
With the Easy XML Editor you can show nodes of a XML file in sub views.
This helps to handle large, complex XML files. Changes applied to sub views are directly applied to all views.
The operation to open a sub view can be accessed using the context menu or by clicking the icon:
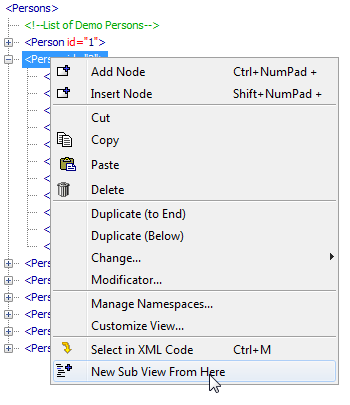

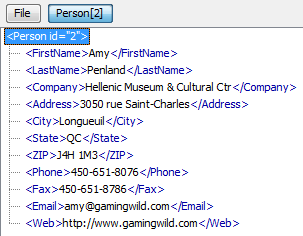
This will add a sub view. It is labeled with the name of the node and its position.
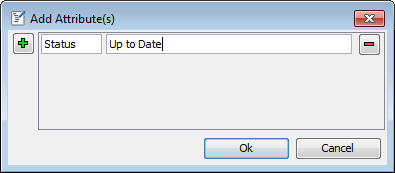
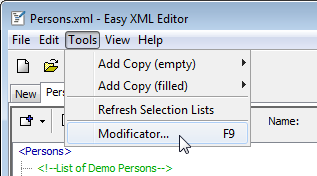
The so called Modificator enables you to define a set of conditions. If these conditions are met for a node, several actions can be applied to these node.
This allows to apply flexible correction operations. The modificator is accessed via the menu item Tools->Modificator:
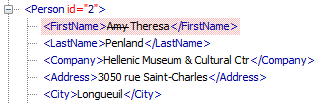
In this example a child "Status" is added to every node "Person" having an attribute "id".

You can apply the operations to the current file (see window title) or all opened files. Is "Selection only" activated, only the selected nodes are considered.
Use the right mouse button to add conditions or actions or to remove all:

Counter variable: Via the button 'Counter ($i)' you configure the counter variable:

In this window the start value, step size and output format can be customized. With clicking the button with the question mark you can access a web site that describes the possibilities of the output formatting. In order to see which counter values will be generated, move the mouse over the 'Preview' text.
Not all actions are available in the test version! As a matter of course in the full version they are.
3. Quickly Add Similar Elements/Attributes
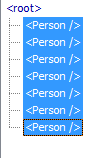
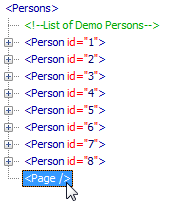
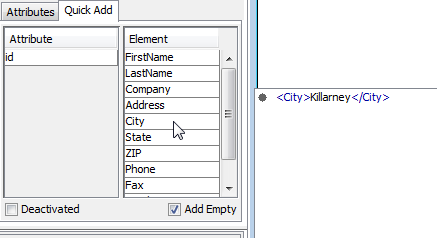
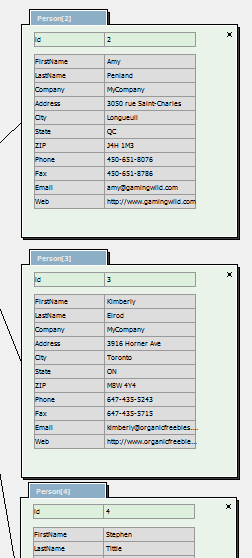
The Easy XML Editor offers a simplified way to add copies of existing nodes/attributes. For the example file it may be a common task to add new "Person" nodes.

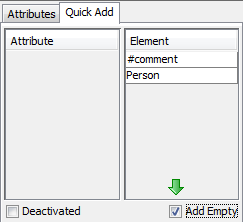
In tab "Quick Add" suggestions are shown:

By moving the mouse cursor of the entries a preview is shown (see screenshot). With double clicks the suggestions are added. For this example we want to add the suggested node with empty contents, for this activate the option "Add Empty":
After a double click on the entry the new (empty) Person is added:
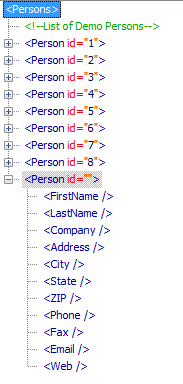
For another example we assume, a node "Person" without any children already exists:
We can fill it with the necessary child elements/attributes.
4. Edit the XML Code
As an alternative to the XML tree editing you can also edit the XML code directly. Changes applied to the XML code can be applied to the XML tree.
After opening a file you can access the XML code using the icon of the tool bar.

In the text editor the several parts of the XML syntax (tags, attributes, comments) are colored: (the colors used can be changed in the options)
You can also show the text editor next to the XML tree or in an extra window. To do this, use the context menu of toolbar icons or the text editor:
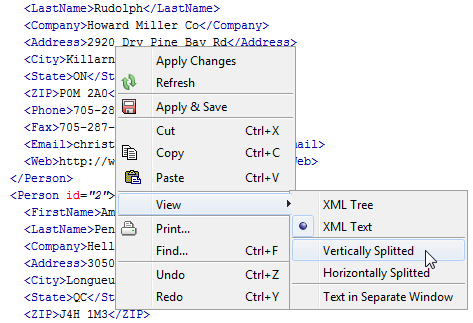
An example for XML tree and XML code side-by-side is shown here:

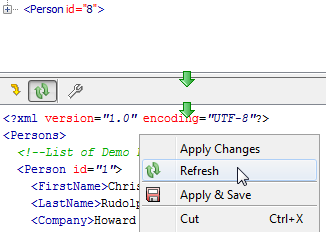
In order to synchronize the changes between XML code and XML tree, use the items in the context menu of the text editor.
To apply changes of the XML code to the XML tree, please use the function "Apply Changes".

But should the XML code be updated, select "Refresh" from the menu:
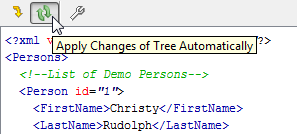
To apply the changes of the XML tree automatically, activate "Apply Changes of Tree Automatically".
Please mind that for large files the recreation of the XML text may by remarkable computation effort. Because of this it may be reasonable to execute the recreation only manually for large files.
4.2 Select Nodes of XML Tree in XML Code
For better orientation you can select the text representation of a tree node in the text editor. For this, use the function "Select in XML Code".

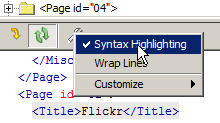
4.3 Use Line Wrapping and Syntax Highlighting
Line wrapping and syntax highlighting of the XML code is activated/deactivated using the "Options" menu:
4.4 Customize Font Face and Font Size
You can change the font properties of the text editor in the options: View->Options
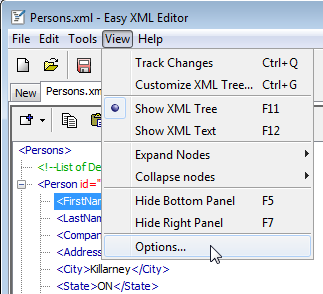
Switch to the tab 'View', there you can make the changes. Confirm with 'Ok', the changes are applied immediately.


4.5 Customize Tabulators and Line Breaks
You can customize, how wide a tabulator indentation should be in the editor (in number of characters) and whether a special symbol should be shown for every tabulator.
These options are located in View->Options (see screenshot of previous section).
The following screenshot shows an example with tabulator signs shown.

The options of identation are also applied to the text editor. For more information see chapter: 11.1 Save: Customize output
5. Full Text Search/Replace
The full text search is accessed via the tab 'Find' in the bottom part of the main window:

Here you can perform full text searches for nodes and attributes of the XML tree. The search results are listed.
A list of search results could look like this:

When clicking on one of the lines, the XML tree jumps to the search result.
These options are available for searching:
- Case sensitive: If this options is deactivated, also hits with different case are listed
- Full match: If activated, only hits that exactly match the input are listed. This means no additional text is before or after the text searched for. If deactivated, everything is found that contains the text entered.
- In elements: Here you activate/deactivate whether in names or text content of elements should be searched
- In attributes: Here you activate/deactivate whether in names or text content of attributes should be searched
- More node types: Here you specify whether in the other node types should be search
- Find node types: If this is activated, the node types selected are found, regardless of their content. If for example you want to find all comments, select 'Comment' and 'Find node types'.
- Replace...: Direct replacement of text searched; alternatively you can select all or some results in the list and replace using the context menu (right mouse button)
6. Undo/History
If you want, the Easy XML Editor can mark all changes applied to the XML tree.
Whether changes should be shown in the XML tree is configured using the menu item View->Track Changes
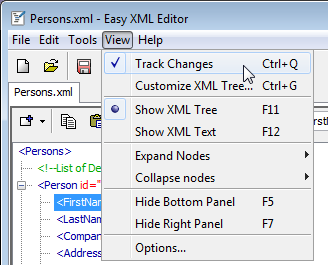
If the option is activated, the changes are marked using several ways. See next section for details.
6.2 Ways of Modification Indication
Modifications are indicated as follows:
Node name or node text (red text):

Node attribute changed (name, value): (red text)

Node added (green text):

Node deleted (striked text)

All modifications applied to the XML tree are listed in the tab 'Undo/History'. The tab is, by default, located at the bottom of the main window.

Using the buttons 'Undo' and 'Redo' or CTRL+Z, CTRL+Y you can go one step further or one step back.

With the menu item 'Clear History...' (also in context menu of undo list) you can remove the items in the change history. Doing this will no longer mark the changes, please mind that redo/undo will no longer be possible after doing this.

7. Edit XML Data Using the Table Edit Feature
With the Easy XML Editor you can easily map XML data to tables. This offers the possibility to apply changes in a new and handy way.
First it is needed to define, how XML nodes and attributes are mapped to tables. How to do this is described in the example that follows.
7.1 Step 1: Selecting the Table Root Node
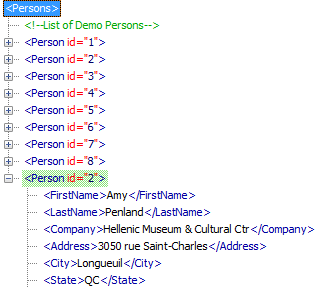
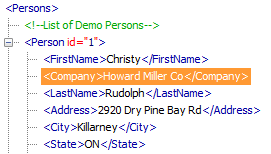
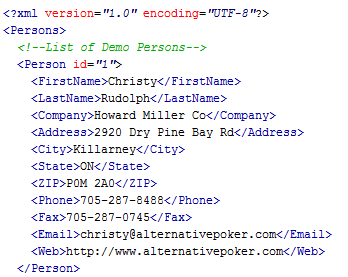
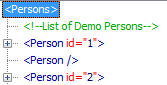
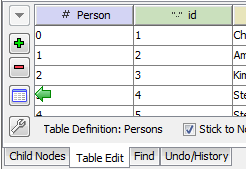
Please select the node whose children or child-children contains the attributes or elements to change. In our example this is the XML file root node 'Persons'. It contains multiple persons with their data.
7.2 Step 2: Open the Editor to Create the Table Definition
Please choose the tab 'Table Edit' located at the bottom of the main window (by default).
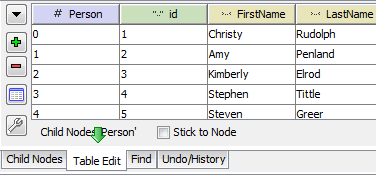
A click on the arrow down (
 ) will open the menu to select/manage table definitions. No table definitions are exist yet, let us choose 'Create Table Definition':
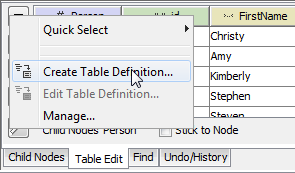
The table definition editor is opened:

It is used to define the table definition, for more information see next step.
7.3 Step 3: Choosing the Reference Node and Saving the Table Definition
In this step you choose a node that acts as a reference node for the columns of the table. The children and attributes of this node specify, which columns the table would have.
Because of this you should choose a node as reference not that already has most of the children and attributes you like to edit. In our example we can choose any of the nodes, they are very similar:

To proceed, please select one of the nodes of the first level and click "Choose as Reference Node".
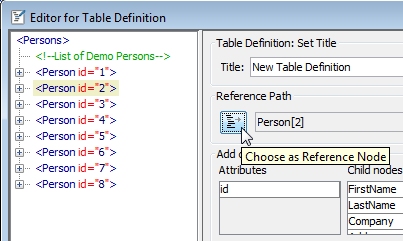
The node is used as reference node, it is marked in color.
The list of columns defined and the preview table is updated.

In the preview you may see the columns:
- Person: Index of the Person-node
- id: the attribute id of the Person node
- FirstName, LastName, ...: the child nodes of the person
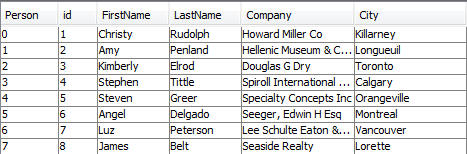
For editing the master data we want to omit some columns.

The preview is updated, the columns are removed. The table definition is configured as we want it.
Using the context menu you can also reorder the columns or edit column details. Reordering is done even faster when using the mouse wheel with pressed ALT key on selected entries.
Details are configurable for each column type:
- Index columns: Contain a counter for child nodes of the same name. To make the table more clearly you can optionally show values of attributes or child nodes; to do so write the relative path in squared brackets, e.g. [Visit/Date]
- Attribute columns: For an attribute column definition only the attribute name is needed
- Element columns: For an element column definition set the name of the element(s) and the number of columns. Multiple child elements are accessed, e.g. name[1], name[2]
To finish the creation of the table definition, enter a title and confirm with 'Save'.

7.4 Step 4: Apply Changes to XML Data
Along with saving the table definition it is chosen for the tree node selected. The table is populated and the name of the table definition is shown.
Using a double click (by default) on a cell it can be edited.

The modification is directly applied to the tree.
These changes are marked in the tree, for more information see
Chapter:
6. Undo/History
-
Insert rows
Using the button "Add Row" you can add a row beneath every selected row:
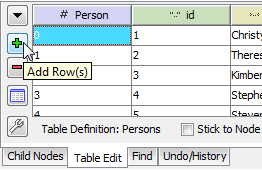
Doing this will add an empty node to the tree. The gray fields in the table indicate that the attributes/elements (id, FirstName, ...) do not exist yet.

You can also use the keys INS or CTRL++ to achieve this.
These changes are marked in the tree, for more information see
Chapter: 6. Undo/History -
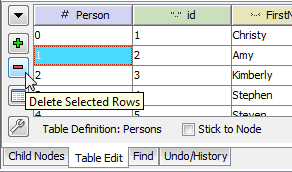
Delete row(s)
Using the button "Delete Selected Rows" you can delete the selected rows.
These changes are marked in the tree, for more information see
Chapter: 6. Undo/History -
Stick to Node
Typically the content of the table "Table Edit" is switched to the node selected. To prevent this, please activate the option "Stick to Node". When working with the tree, the table will stay fixed to the node selected before.

-
Show table in new window
To edit data more easily you can show multiple tables in own windows. Use the option "Stick to Node" as described in the previous bullet point.
A new window is opened using the button "Open Table in New Window":

-
Sort tables
You can sort the tables by single columns. Clicking once or twice on a table column will sort ascending/descending. The asterisk indicates sorting for this column.

-
Change multiple values
Using the function "Change Values" you can change the data of multiple rows easily. For this, select the rows to edit, holding down SHIFT or CTRL may help.
When all rows are selected, right click into the table and choose "Change Values" from the context menu.
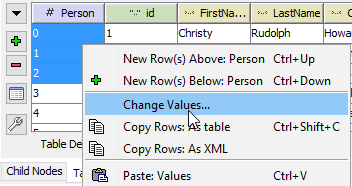
The window "Set Values" will appear. By activating the checkbox "change" you declare that the value should be changed. If so, enter the new value into the text field.
Activating "delete" will delete the corresponding attributes/elements (including children!).

By confirming with "Ok" the changes are applied.

These changes are marked in the tree, for more information see
Chapter: 6. Undo/History
7.6 Exporting the Data of Table Edit
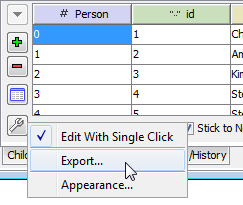
You can export the data as shown by table edits to the clipboard or a file. To do this, click the button "Options" and in the context menu "Export".
A dialog is opened where the properties of export are specified:
- Export destination: To clipboard or file
- Delimiter: Delimiter to separate values from each other
- Text for [no value]: Is set for cells that do not have a value (no node/no attribute exists)
- Add headings: If activated, a heading row is added to the top.
By clicking on the button "Export" the data is exported according to the properties set.
8. Encoding
Using the menu item File->Encoding the character encoding of the currently selected file is changed:

Customize lists: The list of encodings can be customized, for details see next section.
These character encodings are supported by the Easy XML Editor:
- UTF-8 (Unicode)
- ISO-8859-1 (Western Europe)
- ISO-8859-2 (Western and Central Europe)
- ISO-8859-3 (Western Europe and South European)
- ISO-8859-4 (Western Europe and Baltic countries)
- ISO-8859-5 (Cyrillic alphabet)
- ISO-8859-6 (Arabic)
- ISO-8859-7 (Greek)
- ISO-8859-8 (Hebrew)
- ISO-8859-9 (Western Europe with amended Turkish character set)
- ISO-8859-13 (Baltic languages plus Polish)
- ISO-8859-15 (Western Europe, additional signs)
- Windows-1250 (Windows Central European)
- Windows-1251 (Windows Cyrillic alphabets)
- Windows-1252 (Windows Western languages)
- Windows-1253 (Windows Greek)
- Windows-1254 (Windows Turkish)
- Windows-1255 (Windows Hebrew)
- Windows-1256 (Windows Arabic)
- Windows-1257 (Windows Baltic languages)
- Windows-1258 (Windows Vietnamese)
- KOI8-R (Russian)
- GB18030 (China simplified)
- Big5 (China traditional)
- TIS-620 (Thai)
- ISO-2022-JP (Japanese)
- ISO-2022-KR (Korean)
Optionally you can customize the list of encodings to choose from in the menu item File->Encoding. For this, open the options using View->Options:
Switch to the tab "Encoding"
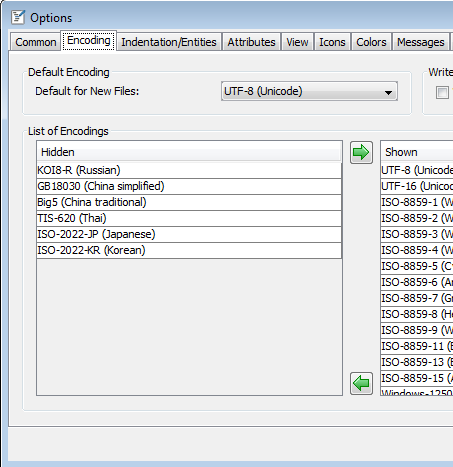
Here you can specify the shown/not shown encodings.
8.3 Preselection for New Files
The encoding preset for new files is set in View->Options, tab "Encoding". This property is also used if no encoding could be determined on file opening. (e.g. missing tag <?xml version="1.0" encoding="UTF-8" ?>)

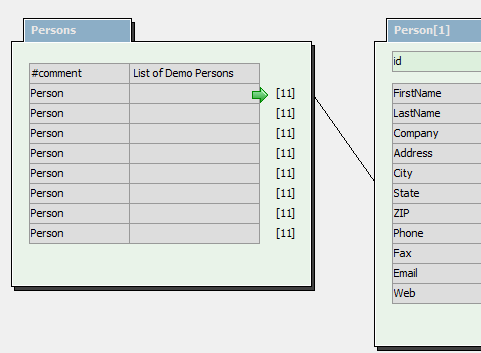
9. Edit XML as Graph
Easy XML Editor allows you to edit XML files as graphs. For the several elements rectangles are shown that can be arranged to visualize the XML data. The term "box" is used to indicate those rectangles in this help text.

Any element is shown as follows:

The graph view can be opened using the icon in the toolbar:
To zoom in and out, you can use the combo box in the top right or the mouse wheel when the CTRL key is pressed.

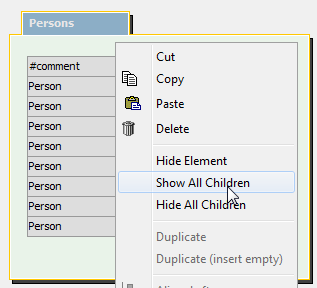
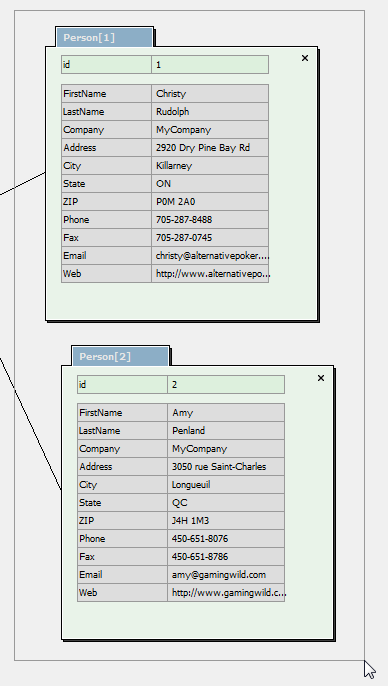
To show a sub element, click on the number in the row of the parent element. This number indicates the count of children of the child. For closing element boxes, click on the ‘x’ in the right top corner.
As an alternative sub elements can be shown/hidden by right clicking an empty area of the box. The context menu will open, select ‘Show all children’ or ‘Hide all children’.
To select boxes click on a single box or draw a box around with left mouse button hold down.
Selected boxes are colored. By holding down the SHIFT key you can add boxes to the selection by clicking on them.
The data of elements shown can be added directly in the graph. To do this select a single box and edit the text in the fields.

The Plus signs on the left are to add or insert attributes or children.
The Plus sign on the right are for adding child elements to the corresponding row.
Click on the trash icons to delete attributes or children.
Change node type
The node type is changes using the context menu of the name field.
The functions to align and distribute are accessed using the context menu or the icons on the left of the window.


In the following example the boxes shall be align left and distributed with equal spaces. First we select the boxes by dragging a frame around them:

The boxes are selected. Selecting "Align: left" in the context menu will make them positioned in line.

Like this:
"Distribute equally: Vertically" will distribute them:

9.6 Adjusting Connection Lines
For every box you can configure, in which direction a line will leave it. In this example the lines are leaving the upper box at its bottom (Default is "From right")

To change this, please use the icons on the left of the window:

To be able to reuse a layout, the adjustments of the boxes can be saved in a so called layout. Layouts are edited with the controls located top left in the window:

To save the layout click on the button "Save"
 . The current box adjustment is saved to the layout.
To load a layout, select an entry from the list. In a layout it is saved which children of which element are positioned where. Because of this it is also possible to apply a layout to other XML files than the one it has been created with.
You can print the view, printing is accessed with the "Print..." button on the left:

For the graph view there are multiple designs available. Which design to use is selected with the list in the top right corner.

10. Customizing the User Interface
You can customize the arrangement of the tabs in the main window. For this right click on tab's title, a list of options is shown:
In this example we move the tab "edit" into the bottom part of the right panel. By clicking "move to right/bottom" the tab the moved:
To move the tab next to "Attributes", select "move left" from the context menu.
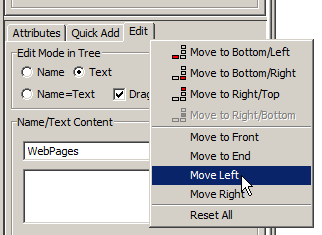
The tab is rearranged.
Please note: When closing Easy XML Editor the properties of the last opened file are saved and applied to every new and opened file.
10.2 Hide the Panels on the Right and the Bottom Temporally
The panels in the window can be hidden if needed. This gives more space for the remaining parts.
To hide/show the keys F5 and F7 or the corresponding menu items in 'View' can be used:

Instead of using the keys or the menu items you can also drag the divider at the border of the window into the window. This will open the panel.
10.3 Configure the Font Sizes and Font Appearance of The XML Tree and the Table Edit
You can customize the appearance of the XML tree and the table edit to match your preferences. Customizable aspects are the font and sizes. The options are changed in tab 'View' of the application options:

Here you can change font face, font size and line height. The following screenshots show examples of values changed:


With the buttons "Choose..." typical combinations of these operations are accessed (see below).

10.4 Configure the Basic Appearance of The XML Tree
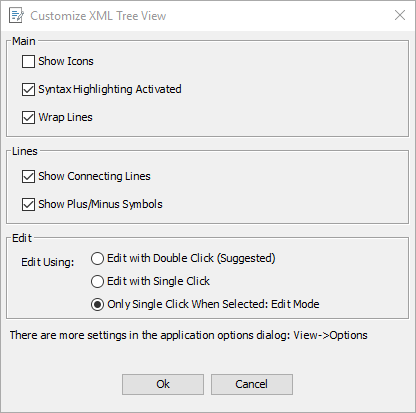
For appearance of the XML tree you can configure:
- Icons shown on/off
- Syntax highlighting on/off
- Line wraps in multi lines text content on/off
- Connecting lines shown on/off
- Plus/Minus symbols shown on/off
- How editing is performed
To do so, open the configuration dialog using the context menu or the main menu "View->Customize XML Tree":
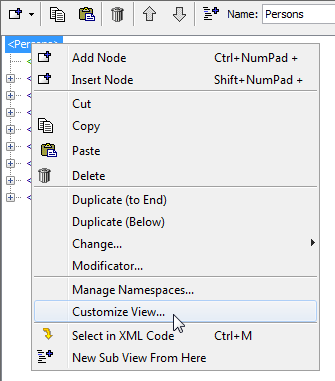

Options of the configuration dialog:
Two examples for changed appearance:


10.5 Changing the Icons of the Tree
You can customize, which icons are to be shown in the tree. This is an example for changed icons:

To change them, please open the options dialog (View->Options). In the options dialog it is the tab 'Icons':
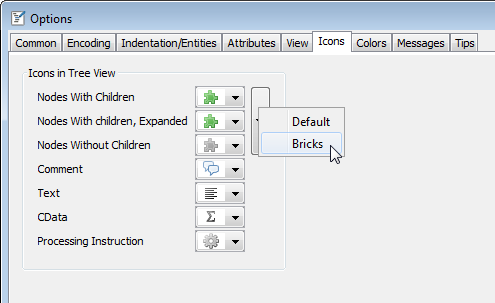
With the button "Choose preset..." typical presets can be accessed for the first three icons.
You can change the colors used in the tree and the text edit as you want.
To do this, select menu item View->Options and the tab 'Colors':

To select a color please click on a preview, the color pick dialog is shown:

The buttons Minus/Plus are quick helpers to adjust the colors.
11. Save/Print/Export
11.1 Save: Customize XML Output
To customize the output of the XML code these properties can be changed:
- Indentation: How are levels separated?
- Entities: which entities are stored as characters or in the form &#nnnn;?
- Attributes: Sort order of attributes (Sort alphabetical/sort by text length)
- Attributes: Indent attributes after a specific count of characters
The options for indentation/entities can be found in the options (View->Options), in tab 'Indentation/Entities':

For the indentation you specify, which characters are used to indent (spaces, tabulators) and the number of characters for each level. Under certain circumstances it may be wished to not use any line breaks, if this is necessary, please deactivate the option 'Wrap lines'.
When saving XML, special characters (called entities) can be saved either as character (e.g. €, &) or encoded in text (e.g. € for the euro symbol). How the special characters are written to elements or attributes, is defined in this page (see above).
Some properties (&, <, ") are not changeable because they are needed to generate valid XML. A list of the entities handled by the option "Numeric encoding for all remaining entities" can be found on this page in chapter "Character entities in HTML": http://en.wikipedia.org/wiki/List_of_XML_and_HTML_character_entity_references
The properties for attributes can be found in the options dialog (View->Options) in tab 'Attributes':
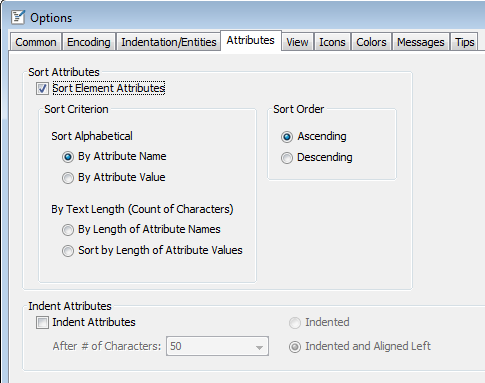
Write attributes sorted: You can sort attributes by attribute name or attribute text:
- Alphabetically
- According to text length: The arrangement of attributes according to the text length may be a criteria for good readability, for example attributes with shorter text can be arranged first
Indent attributes: Here you specify, how many characters an attribute may claim until a line break is inserted. For example:
Without indentation:

With indentation:


Aligned left means that attributes are indented so that they are at the same position as the first attribute
You can print the tree view or the text.
To print one of them, choose the menu item File->Print...

The content of the file loaded can be exported to a HTML file. With it you can e.g. send the contents in a readable form.
To do this, choose the menu item File->HTML-Export.

The result may look like this:

12. Short Tips Show in Application
On the top right of the main window tips are shown for some options you have used. Tips typically suggest a shortcut or something similar.
Move the mouse cursor over the tip to see the full description:
If you want to hide a tip or not show it in the future, please use the icons:
-
 Removes the tip from the current list of tips
-
 Will not show the tip again
You can also customize this option in the options dialog (View->Options):

To hide the tip area please click on the bulb.
13. The Most Important Hints Described Quickly
In this chapter hints are summarized that even experienced users may not have seen.
-
Open via drag-and-drop: You can open files by dragging them from the Windows Explorer© into the Easy XML Editor window.
Details on this can be found in Chapter 1.2 . -
Quickly add element nodes or attributes: Use the key 'a' or 'e' when nodes of the tree are selected to add attributes or elements using a dialog.
Details on this can be found in Chapter 2.7 . -
Key shortcuts:
In the XML tree view you can use this key shortcuts:- CTRL+C: Copy
- CTRL+V: Paste
- CTRL+X: Cut
- CTRL+D: Duplicate node(s)
- CTRL+S: Save
- CTRL+W: Close file
- CTRL+Q: Toggle 'Track Changes'
- INS: Add node
- DEL: Delete node(s)
- CTRL, SHIFT: hold down and click to add nodes to the selection
- a/e: Quick add elements/attributes using a dialog (see Chapter 2.7 )
- ENTER: Edit selected node, using the edit mode set in panel 'Edit'
- F2 or SHIFT+ENTER: Edit name of selected node (see Chapter 2.1 )
- F3 or CTRL+ENTER: Edit text of selected node (see Abschnitt 2.1 )
- F4 or ALT+ENTER: Edit name and text of selected node (Format: [name]=[text]) (see Chapter 2.1 )
- 1, 2, ...: Edit first/second/... attribute, using the edit mode set in panel 'Edit'
- CTRL+1, CTRL+2, ...: Edit text content of first/second/... attribute
- SHIFT+1, SHIFT+2, ...: Edit name of first/second/... attribute
- ALT+1, ALT+2, ...: Edit name and text content of first/second/... attribute, in format [Name]=[Text content]
- CTRL+SPACE (when in edit mode): Show completion list
- CTRL+CIRCUMFLEX (^ next to the 1): Switch to tree from every part of the main window; if tree is selected, switch to 'Attributes'
- (If selection list is shown) CTRL+ENTER: Select first entry of selection list
In the table edit these key shortcuts can be used:- INS, CTRL+DOWN: Add row beneath
- CTRL+DEL: Delete marked rows
In the tabs "Attributes" and "Child nodes":- INS, CTRL+DOWN: Add entry beneath
- CTRL+DEL: Delete entry
- DOWN, UP, LEFT, RIGHT: jump between the fields
- Move nodes: Use mouse wheel or ARROW UP/DOWN with pressed ALT key to move the position of nodes
- In list of configured columns of the table definition editor: Mouse wheel with ALT key pressed will move the selected column up/down.
-
Edit graph:
- SHIFT: Add elements to selection
- CTRL+Mouse wheel: Change zoom